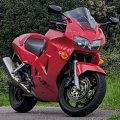
Yo, 5th gen lover here. A little back ground to start. I have 2 - 5th gens now. One with low kms that has been dropped another also with low kms in good shape. I have had a 4th gen and now 4 - 5th gens.
I am in the process of repairing the OEM fairings/cowls and painting. I have used 2 different methods of repairng the abs plastics.
https://easyabsrepair.com/?srsltid=AfmB ... XL5hRL1JZi
https://plastex.net/
The plastex is incredible to repair tabs and rebuild parts easily with the silicon moldible backing. The easy abs repair is good for cracks but you can not lay it on thick as I was having trouble with air/gas inclusions. I am still working on the plastics and have used a plastic filler on spots but have not sanding anything yet.
I used aircraft paint stripper on the tank as it is metal. The stuff in nasty and had to be re appled many times to get all the paint and deacls off.
https://proformproducts.com/products/ai ... -stripper/
I have set up a table and canopy with plastic curtains out back to do the painting. With just enough care I should be able to pull of a decent paint job with some buffing and polishing. Repair and paint any other way is just cost prohibitive.
I have primed the tank and it looks good. The underside not so much as the metal was not prepped the same as the top in the factory.
https://dominionsureseal.com/product/3- ... 35c69ed3bc
I will upload some pictures soon.
Rattle Can, my journey.
-
maxredline

- Posts: 47
- Joined: Fri Jun 12, 2026 4:22 am
- Location: Canada, Van Isle
- Has liked: 5 times
- Reiceved a like: 55 times
Rattle Can, my journey.
You do not have the required permissions to view the files attached to this post.
Last edited by maxredline on Wed Oct 07, 2026 2:40 pm, edited 1 time in total.
Just do it, time runs out.
-
maxredline
- Posts: 47
- Joined: Fri Jun 12, 2026 4:22 am
- Location: Canada, Van Isle
- Has liked: 5 times
- Reiceved a like: 55 times
Abs repairs complete. Now its time to do some body work fill. You must use a flexible plastic filler. This is a first time that I have tried this product.
https://dominionsureseal.com/product/su ... 35c69ed3bc
I hope it sands nice an easy but being a plastic product I know it wont be as nice as everyday bondo which I will use on the metal gas tank if needed.
https://dominionsureseal.com/product/su ... 35c69ed3bc
I hope it sands nice an easy but being a plastic product I know it wont be as nice as everyday bondo which I will use on the metal gas tank if needed.
You do not have the required permissions to view the files attached to this post.
Just do it, time runs out.

-
maxredline
- Posts: 47
- Joined: Fri Jun 12, 2026 4:22 am
- Location: Canada, Van Isle
- Has liked: 5 times
- Reiceved a like: 55 times
In this day and age I imagine you could pay to have it shipped almost anywhere.
I have a sneeky feeling its super glue with baking soda. If you would need its silicon moldable backing to make shapes you could possibly use some sort of putty or clay.
Just a thought.
I would try on a test peice if you can't find the plastex.
I have a sneeky feeling its super glue with baking soda. If you would need its silicon moldable backing to make shapes you could possibly use some sort of putty or clay.
Just a thought.
I would try on a test peice if you can't find the plastex.
Just do it, time runs out.
-
maxredline
- Posts: 47
- Joined: Fri Jun 12, 2026 4:22 am
- Location: Canada, Van Isle
- Has liked: 5 times
- Reiceved a like: 55 times
As I suspected the plastic filler is tricky. As it is two parts you have to lay it down within 2 minutes, thin and smooth.
When sanding you have to use a pretty course grit to get material off. I have been using 150 and sometimes 100 grit. You have to use a light hand so that you do not rip the plastic and grove other parts. Once you get the hang of it its not too bad but you have to be smart and use patients.
Once I have the fill to my liking I will use the plastic adhesion promotor on the bare plastic spots and then prime repaired areas first for a bit of build up, lightly sand then prime the rest.
When sanding you have to use a pretty course grit to get material off. I have been using 150 and sometimes 100 grit. You have to use a light hand so that you do not rip the plastic and grove other parts. Once you get the hang of it its not too bad but you have to be smart and use patients.
Once I have the fill to my liking I will use the plastic adhesion promotor on the bare plastic spots and then prime repaired areas first for a bit of build up, lightly sand then prime the rest.
You do not have the required permissions to view the files attached to this post.
Last edited by maxredline on Wed Oct 07, 2026 2:44 pm, edited 1 time in total.
Just do it, time runs out.
-
maxredline
- Posts: 47
- Joined: Fri Jun 12, 2026 4:22 am
- Location: Canada, Van Isle
- Has liked: 5 times
- Reiceved a like: 55 times
I found a plastic 2 part filler that is much "lighter" or easier to sand. Not that it replaces the first filler I used but feathers out small blemishes.
You do not have the required permissions to view the files attached to this post.
Just do it, time runs out.
-
maxredline
- Posts: 47
- Joined: Fri Jun 12, 2026 4:22 am
- Location: Canada, Van Isle
- Has liked: 5 times
- Reiceved a like: 55 times
Primed ready to base coat. Colour is a bit off in the picture but it is all gray.
This is where to find all your bodywork flaws while still in primer!!!!
This is where to find all your bodywork flaws while still in primer!!!!
You do not have the required permissions to view the files attached to this post.
Last edited by maxredline on Sat Sep 19, 2026 10:50 pm, edited 1 time in total.
Just do it, time runs out.
-
maxredline
- Posts: 47
- Joined: Fri Jun 12, 2026 4:22 am
- Location: Canada, Van Isle
- Has liked: 5 times
- Reiceved a like: 55 times
Dropped the front cowl just after painting. I was rushing to get the second coat on before I lost the window to do so. Now I have to repair the part  . I have to let the paint cure for a few days to harden up before I can do some heavy sanding and probably fill at least one deep scratch. Now with the blue colour on the panels I can see some imperfections on other parts that I will sand out also
While I am at it I am going to change the colour as It did not turn out the way I wanted. I am now going for a GMC truck stone blue colour with metal flake. Hopefully the paint shop can produce this in a spray can.
There is going to be a bit of a delay getting this done now. Good thing I am retired or I would be pissed off.
. I have to let the paint cure for a few days to harden up before I can do some heavy sanding and probably fill at least one deep scratch. Now with the blue colour on the panels I can see some imperfections on other parts that I will sand out alsoWhile I am at it I am going to change the colour as It did not turn out the way I wanted. I am now going for a GMC truck stone blue colour with metal flake. Hopefully the paint shop can produce this in a spray can.
There is going to be a bit of a delay getting this done now. Good thing I am retired or I would be pissed off.
Just do it, time runs out.